Simplified React Native Environments: Android & IOS (2024)


Table of contents
- Step 1 : Setting up config library
- Step 2: Create env files
- Step 3: Android — Add code for multiple environments.
- Step 4 : Android — Create FlavorDimensions and ProductFlavors
- Step 5: Android— Different App names and Icons for each environment
- Step 6: IOS — Update Podfile
- Step 7: IOS — Setup testflight with App IDs, certificates and profiles
- Step 8: IOS — Create new targets and attach profiles, info.plist and App IDs to them.
- Step 9: IOS — Create new schemes.
- Step 10: IOS — Different app names and app icons for each environment.
- Step 11: IOS —Install dependencies.
- Step 12: Add scripts to run the app or create APKs.
In this article, I have added all the steps combined and everything in detail about how to set multiple environments in the React native project that I have collected from various blogs, youtube videos. This will also include how to create apps and different app IDs, certificates, and profiles in a test flight. This article will be lengthy hence feel free to skip the sections that you have already completed.
Overview —
1. We set the config library react-native-config.
2. We created env files.
3. We set up android for reading different environments.
4. We created flavor dimensions and product flavors.
5. We set different app names and icons for each environment for Android.
6. Updated podfile for IOS setup.
7. We set up testflight with app IDs, certificates and provisioning profiles. I also explained the meaning of each term and how to create app IDs, certificates, and provisioning profiles.
8. We created new targets in Xcode and attached profiles, info.plist, and App IDs to them.
9. We created new schemes in Xcode.
10. We set different app names and icons for each env for the IOS app.
11. We added all scripts in package.json to run and build for each environment.
Step 1 : Setting up config library
To manage different environments in one project, we will be using the library react-native-config.
Install the package —
yarn add react-native-config
Extra step for Android — Don’t miss this as envs won’t work in Android without this step. You’ll also need to manually apply a plugin to your app, from android/app/build.gradle:
// Add this in android/app/build.gradle
apply from: project(':react-native-config').projectDir.getPath() + "/dotenv.gradle"
Also, add resValue in the default config as well. Replace com.reactnativeproject with your applicationId
android {

........

    namespace 'com.reactnativeproject'
    defaultConfig {
        applicationId 'com.reactnativeproject'
        minSdkVersion rootProject.ext.minSdkVersion
        targetSdkVersion rootProject.ext.targetSdkVersion
        versionCode 1
        versionName "1.0"
        resValue 'string', 'build_config_package','com.reactnativeproject'

    }

.........

}
Step 2: Create env files
I created 4 files.
.env, .env.dev, .env.stage, .env.prod
You can rename .dev, .stage, and .prod at your convenience.
Put them at the root of your project alongside App.tsx
Add ENVIRONMENT_NAME=development in .env. This is the main file from which react-native-config will pick up ENVIRONMENT_NAME if other env files don’t exist.
You can use it like below:
import Config from "react-native-config";

Config.ENVIRONMENT_NAME; // 'development'
Now add the same key-value pair in all files with different values in each file.
.env.dev: Add ENVIRONMENT_NAME=development
.env.stage: Add ENVIRONMENT_NAME=staging
.env.prod: Add ENVIRONMENT_NAME=production
Also, include any other pairs if you have them.
Now the final goal is to run an app with dev, stage, and prod environments and also build the different APKs/IPAs for these environments.
Step 3: Android — Add code for multiple environments.
Add the following project.ext.envConfigFiles in android/app/build.gradle.
Note: Make sure to add project.ext.envConfigFiles above the “apply” line that we had just entered or else the Gradle will fail to pick the correct env.
project.ext.envConfigFiles = [
        devdebug: ".env.dev",
        devrelease: ".env.dev",
        stagedebug:".env.stage",
        stagerelease :".env.stage",
        proddebug:'.env.prod',
        prodrelease:'.env.prod',
]
apply from: project(':react-native-config').projectDir.getPath() + "/dotenv.gradle"
Here we have given specific keys for each environment. dev is one env key and its file is .env.dev, the stage is another env key and its file is .env.stage and prod is another env key and its file is .env.prod.
Note: Make sure that keys are completely in lowercase.
React native will use these environment keys and associate the environment to their specific files further to recognize each environment. React native already assumes that these files exist in the root folder. If it doesn’t, later it will throw an error.
Step 4 : Android — Create FlavorDimensions and ProductFlavors
Add the following code in android/app/build.gradle
    defaultConfig {
        applicationId "com.reactnativeproject"
        resValue 'string', 'build_config_package','com.reactnativeproject'
    }
    flavorDimensions 'env'
    productFlavors {
        dev {
            dimension 'env'
            applicationIdSuffix ".dev"
        }
        stage {
            dimension 'env'
            applicationIdSuffix ".stage"
        }
        prod {
            dimension 'env'
            applicationIdSuffix ".prod"
        }
    }
Now as you know each app has a unique applicationId associated. If we don’t have any envs we can see applicationId as “com.reactnativeproject”. Now if we have 3 new environments, we will need to assign 3 unique IDs to them. Hence we created productFlavors. Here we gave different applicationIdSuffix for each env. Note that keys dev, stage, and prod are the same as keys used in project.ext.envConfigFiles.
For dev env APK, applicationId would be — com.reactnativeproject.dev
For stage env APK, applicationId would be — com.reactnativeproject.stage
For prod env APK, applicationId would be — com.reactnativeproject.prod
An alternate approach would be to have different minSdkversion, and targetSdkVersion also. Also, you can specify the complete applicationId in separate product flavours each.
android {
    ndkVersion rootProject.ext.ndkVersion
    compileSdkVersion rootProject.ext.compileSdkVersion
    flavorDimensions "default"
    productFlavors {
        dev {
            minSdkVersion rootProject.ext.minSdkVersion
            applicationId "com.reactnativeproject.dev"
            targetSdkVersion rootProject.ext.targetSdkVersion
            resValue "string", "build_config_package", "com.reactnativeproject"
        }
        stage {
            minSdkVersion rootProject.ext.minSdkVersion
            applicationId "com.reactnativeproject.stage"
            targetSdkVersion rootProject.ext.targetSdkVersion
            resValue "string", "build_config_package", "com.reactnativeproject"
        }
        prod {
            minSdkVersion rootProject.ext.minSdkVersion
            applicationId "com.reactnativeproject.prod"
            targetSdkVersion rootProject.ext.targetSdkVersion
            resValue "string", "build_config_package", "com.reactnativeproject"
        }
    }
  }
Step 5: Android— Different App names and Icons for each environment
Create 3 copies of android/app/src/main folder and paste it into android/app/src folder.
Remove java folder from each new pasted copy folder.
Now rename those 3 copies as dev, stage, and prod. These names should be the same as the keys in project.ext.envConfigFiles in android/app/build.gradle.
Now we would have 4 files as main, dev, stage, and prod in android/app/src folder alongside other folders.
You can go inside each copy and change the name from the res/values/strings.xml file.
For example, here’s how strings.xml would look for the dev folder.
<resources>
    <string name="app_name">DevReactNativeApp</string>
</resources>
Also, you can go inside each copy and change the icons inside res folder. Here’s an article on how to change app icons if you don’t know already — https://aboutreact.com/react-native-change-app-icon/
Now the Android setup is done successfully.
Step 6: IOS — Update Podfile
Open Podfile from IOS folder and verify if react-native-config dependency is added.
Note — Only add this if not exist already. Also, replace path with your actual path to react-native-config dependency in react-native-config
pod 'react-native-config/Extension', :path => '../../node_modules/react-native-config'
Step 7: IOS — Setup testflight with App IDs, certificates and profiles
Now the requirement is we need to have these 3 different environments as 3 different builds in testflight. That means we would be using 3 different bundle IDs/app IDs for 3 apps. Let's first create the bundle IDs and add them in testflight.
Before that let's understand some basic concepts/terms around test flight. I will just give a brief overview in layman's language.
First, we create an Apple ID for ourselves, then create an Apple developer account(which can hold multiple apps under it and which is paid) for your organization (if not already exist). If it's already created, then you can get access to that account from your teammate.
AppId/BundleId — Every app in testflight should have a different App ID. consider it as just a unique ID given to any app.
Certificate — Every app should be signed with a certificate. certificate authority gives us the certificate when we raise CSR (certificate signing request) to it. There are two types of certificates: development and distribution.
Development certificate — This is used to sign the debug builds that we run in the simulator. Follow these steps if you need to create a development certificate.
1. You can follow this article and create CSR.
2. Now you can go to your Apple developer account, go to the Certificates section, and create an Apple development certificate by uploading this CSR. Once created you can download it and add it to your keychain by double-clicking it.
3. XCode has access to your local Mac keychain. Hence while creating debug builds, it first checks if your keychain contains a development certificate or not. If exists it signs the debug build with the development certificate and runs the app. If not, it fails to create the debug build.
Note — One development certificate would work for all the apps in one project of the developer account.
Distribution certificate — This is used to sign the release builds which we can publish to the App Store and testflight. Follow these steps if you need to create a Distribution certificate.
1. You can follow this article and create CSR.
2. Now you can go to the Apple developer account, go to the Certificates section, and create an Apple distribution certificate by uploading this CSR. Once created you can download it and add it to your keychain by double-clicking it. This certificate will contain the public key and private key.
3. Now if you create a certificate by yourself, it will be added to the “My certificates” section of the login section of the keychain. You can find the private key by expanding the row. Whoever creates the distribution certificate will have access to the private key.
4. Now you can create the testflight build and while signing xcode will fetch the distribution certificate from a keychain and verify the private key.
5. Without a private key, no one can release the builds. Hence, the private key needs to be shared with other teammates so that they can also use the distribution certificate to sign the release builds.
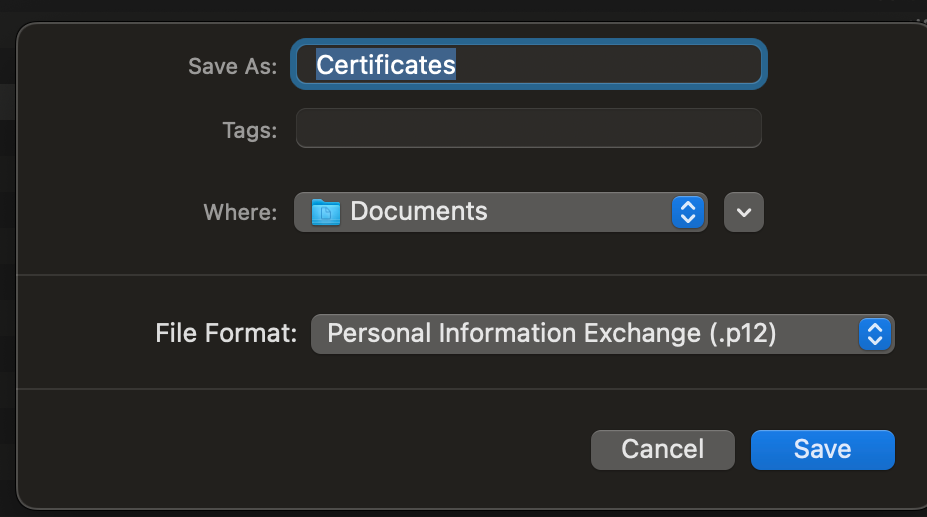
Now you can export this certificate by right-clicking on it and export as a .p12 file. You can add a password and store this file somewhere safe as it would contain the private key.
6. Now your teammate can download the distribution certificate created by you from Apple Developer and add it to their keychain. Here only the public key will be downloaded along with a certificate. Now you can share this .p12 file with your teammates and they can import it into their local keychain by adding a password and verifying. Now After this, they would also have the private key needed to sign their app locally. Xcode directly has access to a keychain and does the live updates in the code signing section based on keychain updates. Xcode can only pick the certificate from my certificates section.
You can follow the first answer to understand more in-depth — https://superuser.com/questions/936840/add-to-my-certificates-in-keychain-access-mac-os-10-10.
Provisioning profile — A provisioning profile is a collection of information that links an App ID with signing certificates and authorized devices.
Now let's start with creating app IDs:
Go to the Certificates, Identifiers & Profiles section of the Apple developer account, and then from the Identifier section create new identifiers.
In our case, new identifier would create bundle ids as follows:
dev — com.reactnativeproject.dev
stage — com.reactnativeproject.stage
prod — com.reactnativeproject.prod
Instead of reactnativeproject you can give your product/company name.
After creating bundle IDS, you need to have a separate provisioning profile for each bundle ID. Hence first we need to create a signing certificate (if not already created) and then attach that signing certificate to the specific provisioning profile.
Create one distribution certificate as mentioned in the above steps (or get access to the private key of the already created distribution certificate) and add it to your keychain.
Now Under “Profiles,” create a new provisioning profile.
Choose “App Store” as the distribution method.
Select the App ID you created earlier.
Choose the distribution certificate you created in the previous step.
Follow the prompts to generate the provisioning profile.
You need to create separate provisioning profiles for each app ID. But you can include the same distribution certificate in all of them.Create 3 provisioning profiles for each app ID in our case.
Step 8: IOS — Create new targets and attach profiles, info.plist and App IDs to them.
Now open XCode and select the main project from the left sidebar. You would see targets. Now duplicate the targets 3 times and we want 3 new targets.
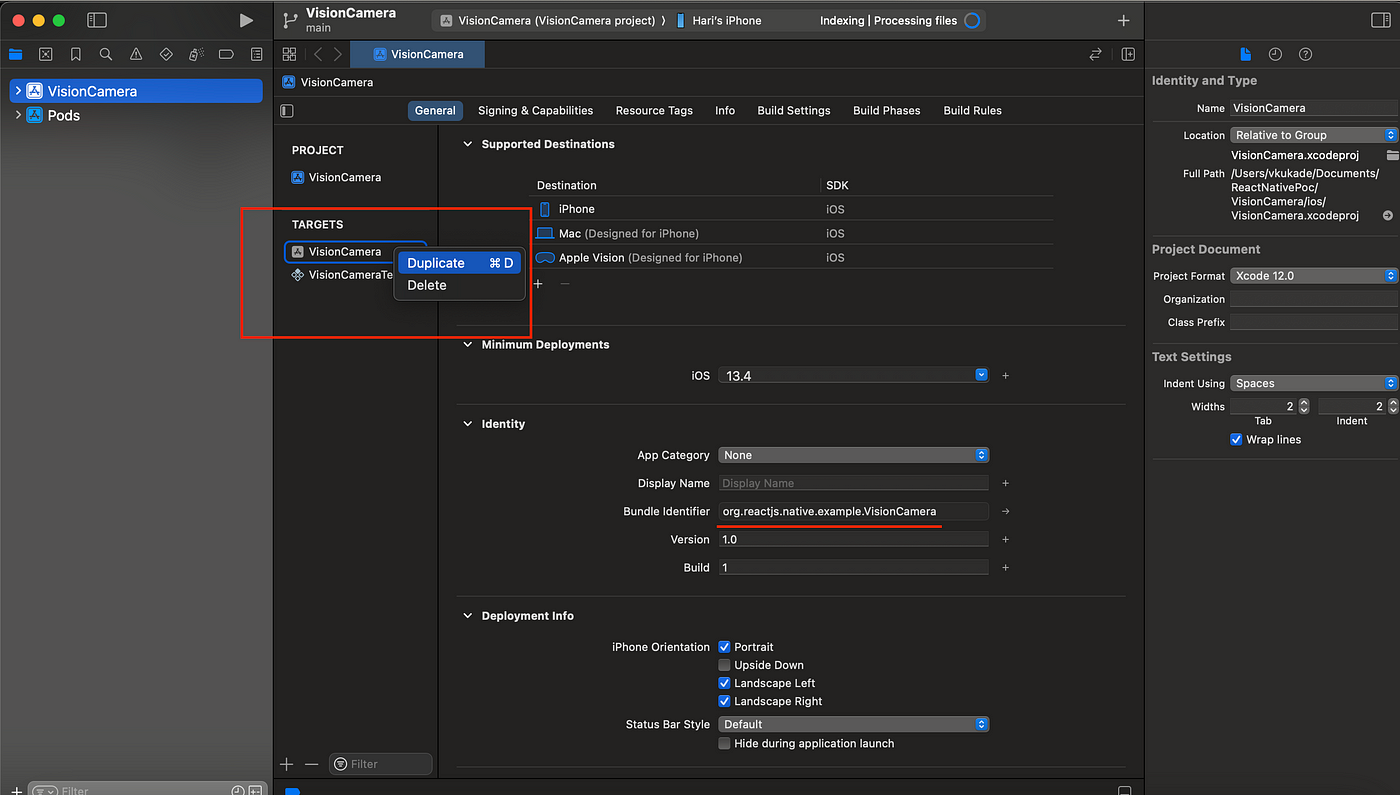
Name these new targets as
reactnativeproject-dev
reactnativeproject-stage
reactnativeproject-prod
Now as you create new targets, new info.plist files would be created automatically for each target. Rename them as follows: select target and click again after a while to rename.
reactnativeprojectDev-Info.plist
reactnativeprojectStage-Info.plist
reactnativeprojectProd-Info.plist
Now follow the following steps for each target.
- Click on target. Go to build settings. Search “Info.plist file” and rename the file again with the above-mentioned names.
Now go to the signing and capabilities section and change the team, bundle identifier. Add the bundle ID as the same one that you added in the Apple developer account as a new identifier. If you automatically manage signing, then the provisioning profile will be automatically selected as per the entered bundle ID.
Step 9: IOS — Create new schemes.
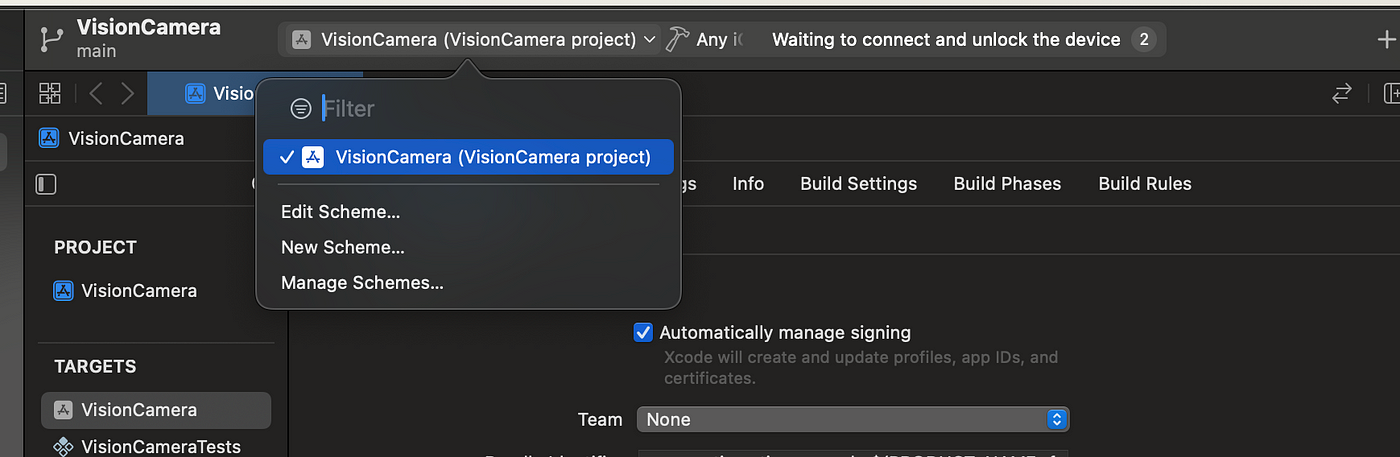
Now let’s create new schemes. In case, 3 new schemes are already created skip creating new schemes. (If already created rename then). You can give the same name as the 3 targets. You can rename them from the “Manage Schemes” section also.
If not created already, click “New Scheme…”, select the specific target, and press OK. Repeat this step for our 3 targets. Now follow the following steps for each newly created scheme.
Click on “Edit Scheme”. Go to Build-> Pre-actions. Click on + and add a new script to run while building an app with this scheme.
Add the following code to the script. Also, repeat the same process for the debug mode pre-actions in “Run” side tab.
Also don’t forget to select “Provide build settings from” and select the appropriate item from the dropdown.
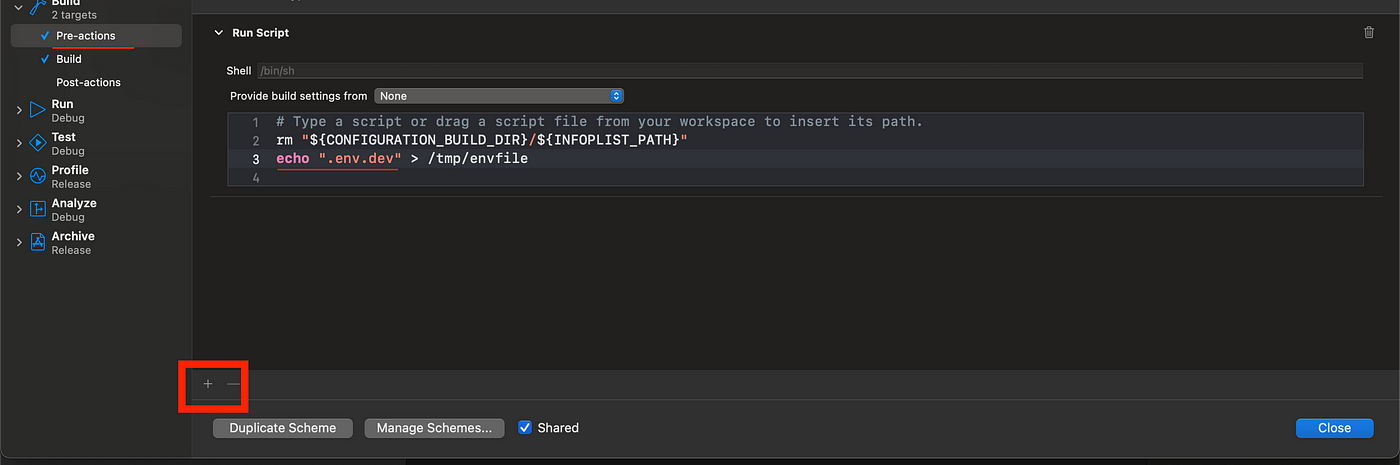
# Type a script or drag a script file from your workspace to insert its path.
rm "${CONFIGURATION_BUILD_DIR}/${INFOPLIST_PATH}"
echo ".env.dev" > /tmp/envfile
While doing this for all 3 schemes make sure to replace .env.dev with .env.stage for stage scheme and .env.prod for prod scheme as they are your env file names.
Step 10: IOS — Different app names and app icons for each environment.
Select the target name, go to general, find the “Display name”, and change “Display name”. Repeat this for all 3 targets.
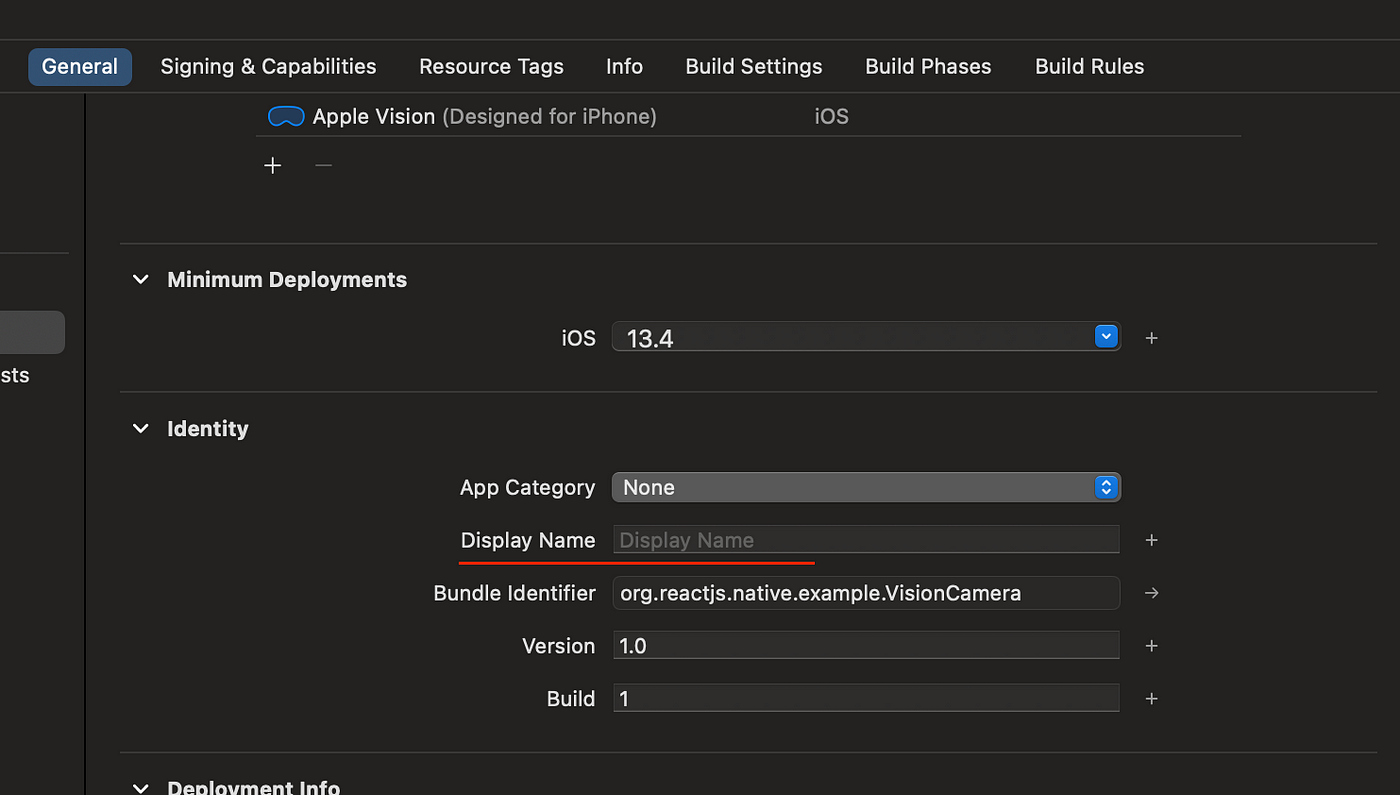
In addition to that open info.plist files from the ios directory and change the value of CFBundleDisplayName to the same name as “Display Name”. Repeat this step for all 3 info.plist files.
Just beneath that, there is a section for the APP icon. You can follow this as a guide to add app icons in IOS.

Edit:
If you face this “RCTAppDelegate.h file not found” issue while running IOS builds, then make the following changes in Podfile:
Add entries for new targets. Ensure that the target name should be the same as the one you entered in Xcode.
target 'reactnativeproject-dev' do
    inherit! :complete
end
target 'reactnativeproject-stage' do
    inherit! :complete
end
target 'reactnativeproject-prod' do
    inherit! :complete
end
Step 11: IOS —Install dependencies.
At last run pod install in the IOS directory.
pod install
Important Advanced steps for Android —
- After completing the setup, when I ran the Android app, somehow my env’s didn’t work. Then I came to know the missing step. There is a file called BuildConfig.java generated for every environment we create. You can find it in a specific environment folder in android/app/build/generated/source/buildconfig folder.
It is generated once you build or run the app with a specific environment.
Inside the file BuildConfig.java we have a class called BuildConfig. react-native-config uses this class and refers to it. BuildConfig class contains all the information for config which is recently been used. This contains the same config as the env file but in a different structure.
The problem is when Proguard is enabled (which is by default enabled for Android release builds), during the modification process it renames the BuildConfig class and hence prevents react-native-config from referring it. Hence we need to add an exception saying not to rename the class.
// add following to android/app/proguard-rules.pro

-keep class com.mypackage.BuildConfig { *; }
Replace com.mypackage with your package name. You can check it in the package value in your app/src/main/AndroidManifest.xml file. Or you can also check it in android/app/build.gradle defaultConfig — applicationId.
2. In android/app/build.gradle, if you use applicationIdSuffix or applicationId that is different from the package name indicated in AndroidManifest.xml in <manifest package="..."> tag, for example, to support different build variants: Add this in android/app/build.gradle
defaultConfig {
    ...
    resValue "string", "build_config_package", "YOUR_PACKAGE_NAME_IN_ANDROIDMANIFEST_XML"
}
Step 12: Add scripts to run the app or create APKs.
Here are the scripts that I am using in package.json.
    "start": "react-native start",
    "test": "jest",
    "lint": "eslint . --ext .js,.jsx,.ts,.tsx",
    "lint:fix": "eslint . --ext .js,.jsx,.ts,.tsx --fix",
    "pods": "pod-install --repo-update",
    "kn": "killall node",
    "adb-r": "adb reverse tcp:8081 tcp:8081",
    "tron": "adb reverse tcp:9090 tcp:9090",
    "resetc": "yarn start -- --reset-cache",
    "node:clean": "rm -rf node_modules && yarn cache clean && yarn install",
    "setDevelopment": "ENVFILE=.env.dev",
    "setStaging": "ENVFILE=.env.stage",
    "setProduction": "ENVFILE=.env.prod",
    "ios:Pod:Reset": "cd ios && pod deintegrate && pod setup && pod install",
    "ios:clean": "yarn node:clean &&  cd ios && rm -rf ~/Library/Caches/CocoaPods && rm -rf Pods && rm -rf ~/Library/Developer/Xcode/DerivedData/* && yarn ios:Pod:Reset",
    "ios:bundle:assets": "react-native bundle --entry-file index.js --platform ios --dev false --bundle-output ios/main.jsbundle --assets-dest ios",
    "android:clean": "yarn node:clean && cd android && ./gradlew clean && ./gradlew --stop",
    "android:bundle:assets": "react-native bundle --platform android --dev false --entry-file index.js --bundle-output android/app/src/main/assets/index.android.bundle --assets-dest android/app/src/main/res",
    "android:remove:assets": "rm -rf android/app/src/main/res/drawable-hdpi &&  rm -rf android/app/src/main/res/drawable-mdpi &&  rm -rf android/app/src/main/res/drawable-xhdpi && rm -rf android/app/src/main/res/drawable-xxhdpi && rm -rf android/app/src/main/res/drawable-xxxhdpi",
    "run:ios-dev": "yarn setDevelopment  react-native run-ios --mode=Debug --scheme \"dev\"",
    "run:ios-stage": "yarn setStaging  react-native run-ios --mode=Debug --scheme \"stage\"",
    "run:ios-prod": "yarn setProduction  react-native run-ios --mode=Debug --scheme \"prod\"",
    "run:android:dev": "yarn setDevelopment  react-native run-android --mode=devDebug --appIdSuffix=dev",
    "run:android:stage": "yarn setStaging  react-native run-android --mode=stageDebug --appIdSuffix=stage",
    "run:android:prod": "yarn setProduction  react-native run-android --mode=prodDebug --appIdSuffix=prod",
    "build:android-dev-debug-apk": "yarn android:clean && yarn setDevelopment && yarn android:bundle:assets && yarn android:remove:assets && cd android && ./gradlew assembleDevDebug && killall -9 java",
    "build:android-dev-release-apk": "yarn android:clean && yarn setDevelopment &&  yarn android:bundle:assets && yarn android:remove:assets && cd android && ./gradlew assembleDevRelease && killall -9 java",
    "build:android-stage-debug-apk": "yarn android:clean && yarn setStaging && yarn android:bundle:assets && yarn android:remove:assets && cd android && ./gradlew assembleStageDebug && killall -9 java",
    "build:android-stage-release-apk": "yarn android:clean && yarn setStaging && yarn android:bundle:assets && yarn android:remove:assets && cd android && ./gradlew assembleStageRelease && killall -9 java",
    "build:android-prod-debug-apk": "yarn android:clean && yarn setProduction && yarn android:bundle:assets && yarn android:remove:assets && cd android && ./gradlew assembleProdDebug && killall -9 java",
    "build:android-prod-release-apk": "yarn android:clean && yarn setProduction && yarn android:bundle:assets && yarn android:remove:assets && cd android && ./gradlew assembleProdRelease && killall -9 java",
    "build:android-prod-release-bundle": "yarn android:clean && yarn setProduction && yarn android:bundle:assets && yarn android:remove:assets && cd android && ./gradlew bundleProdRelease && killall -9 java"
Explaination of scripts -

1. run:ios-dev, run:ios-stage, run:ios-prod - Here the scheme that we used at last of script
which is dev, stage , prod should match the keys of envs we mentioned in project.ext.envConfigFiles
in android/app/build.gradle
This runs the app on simulator/physical device with different envs.

2. run:android:dev, run:android:stage, run:android:prod - Here we used mode as
--mode=devDebug or --mode=stageDebug or --mode=prodDebug. Here also dev, stage, prod in
devDebug, stageDebug, prodDebug should match the keys of envs we mentioned in project.ext.envConfigFiles
in android/app/build.gradle. Also appIdSuffix should also match the keys of envs we mentioned in project.ext.envConfigFiles
in android/app/build.gradle.
This runs the app on simulator/physical device with different envs.


3. build:android-dev-debug-apk, build:android-dev-release-apk - Here dev in
./gradlew assembleDevDebug should also match the keys of envs we mentioned in project.ext.envConfigFiles
in android/app/build.gradle with first letter of key as capital letter.
That’s it for this article. Thank you.